Introduction
Transforming an ordinary outdoor space into a mini backyard golf course can create a fun-filled retreat for family and friends. This guide outlines a straightforward four-step process that simplifies construction and enhances the enjoyment of the game. With numerous design options and materials available, it’s essential to ensure that your course stands out while remaining accessible and entertaining for all skill levels. This article will cover the essentials of building a personalized putting paradise that promises hours of outdoor fun.
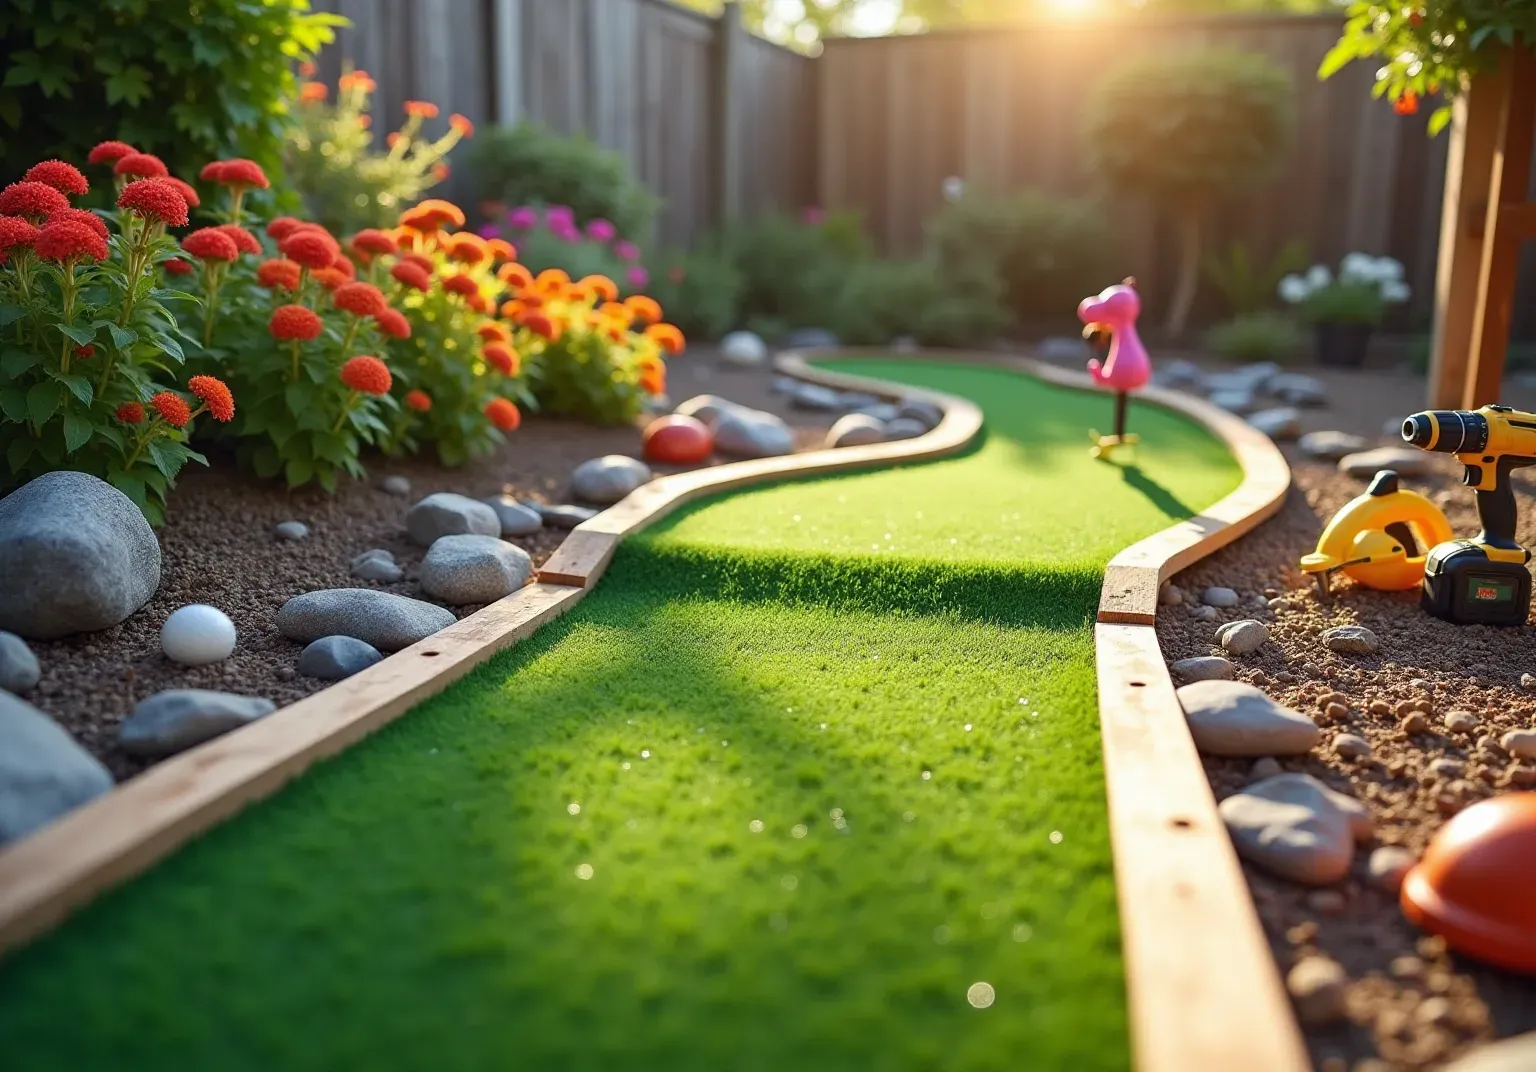
Gather Essential Materials and Tools
Select from that closely resembles natural grass. This ensures a realistic playing surface that enhances the golfing experience. Our synthetic turf is safe for children and pets, , requiring minimal upkeep. This makes it an ideal choice for a . In Southern California, the ranges from $14 to $18 per square foot, making it a worthwhile investment for your .
Utilize for the base and borders of your holes. Plywood sheets are also effective for constructing ramps and obstacles, adding variety to your course. These adaptable materials can be shaped into tunnels or barriers, introducing enjoyable challenges to your layout.
Ensure you have enough balls and putters for all players, which can be easily sourced from sporting goods stores or online retailers. Assemble for precise construction. A shovel may also be necessary for any digging required.
Enhance the visual appeal of your program with , creating an inviting atmosphere. Incorporating is crucial for maintaining the longevity and performance of your .
Having all these materials and tools ready beforehand will simplify your construction process, making it easier to create an enjoyable and engaging . Don't forget to initiate your free consultation with to discuss your vision and receive tailored solutions for your and putting green needs.

Design Your Mini Golf Course Layout
Start by sketching your course layout on paper, following these essential steps:
- Measure your space by evaluating the size of your backyard to identify the available area for a . In Southern California, s typically range from 300 to 1,000 square feet, allowing for a variety of designs.
- Plan the Openings: Determine the quantity of openings, typically ranging from 3 to 9 for a . Each opening should offer a different level of difficulty to keep players engaged and entertained. As golf enthusiast Geoff Bennell suggests, " to keep it enjoyable without frustrating players."
- Incorporate Obstacles: by adding ramps, tunnels, and barriers. Utilize natural elements like rocks, plants, or even to create unique obstacles that enhance the character of your layout. This creative use of household items allows families to personalize their challenges.
- Flow and Accessibility: Arrange the holes to facilitate easy movement between them. Ensure that they are spaced adequately to avoid crowding, allowing players to enjoy the game without feeling rushed.
- Visual Appeal: Focus on the aesthetics of your program. Integrate landscaping features, such as colorful flowers or themed decorations like garden gnomes and plastic flamingos, to create an inviting atmosphere that enhances the overall experience. Furthermore, think about adding to enhance the pleasure and utility of your .
With a carefully planned design in place, you can confidently move to the construction stage, turning your backyard into a charming putting haven. To elevate your project further, initiate your with California Turf Company for .

Construct the Golf Holes and Obstacles
To create your , follow these essential steps for :
- Prepare the Ground: Begin by clearing the designated area for each opening. Level the ground to ensure a smooth and even surface, which is crucial for optimal ball roll.
- Build the Base: Construct a sturdy frame for each opening using wood. Ensure that the frame is level. For ramps, cut plywood to the desired angle and secure it firmly in place to withstand play.
- Install the Turf: Lay over the frames, cutting it to fit snugly. Secure the turf using adhesive or staples, ensuring it remains in place during use. , making it ideal for . To ensure you get the , consider initiating your with California Turf Company for , which offer long-lasting performance and aesthetic appeal.
- Create the Openings: Use a saw to cut out openings in the turf where the golf balls will go. Ensure the holes are deep enough to hold the balls securely, enhancing the play experience.
- Add Obstacles: Construct additional features such as ramps or barriers using PVC pipes or wood. Secure these obstacles firmly to withstand play and add excitement to the layout. Incorporating imaginative features such as tunnels or themed decorations can increase the enjoyment and difficulty of your putting layout.
- Test the Holes: After construction, test each hole with a ball to ensure it rolls smoothly and functions as intended. This step is crucial for verifying that your putting layout is both enjoyable and practical.
By following these steps, you can establish a that not only entertains but also encourages outdoor play and family bonding. With the right materials and thoughtful design, your program can become a cherished feature of your home.
Statistics to Consider: For accessibility, consider keeping rather than the traditional 15-20 feet, making it easier for children and those with limited mobility to enjoy the game.
Expert Insight: As John Petrovsky, manager of Green Section Education, notes, "For most homeowners, a synthetic surface is almost certainly the way to go," emphasizing the benefits of low maintenance and durability.
Case Study Reference: A serves as an , particularly during school vacations, offering families a fun and engaging activity without the necessity for regular visits to commercial facilities.

Add Finishing Touches and Maintenance Tips
To complete your , consider these and maintenance tips:
- Decorate the Course: Enhance the by adding plants, rocks, or themed decorations. Incorporating lighting can create a magical atmosphere for evening play.
- : Keep the turf pristine by routinely removing debris and leaves. Utilizing a leaf blower or a stiff-bristled broom will help maintain a tidy appearance and prevent matting of the grass blades.
- : Regular inspections of the holes and obstacles are crucial. Promptly repair any wear and tear to ensure safety and functionality, as neglecting these issues can lead to larger problems down the line.
- Watering: If your program includes live plants, ensure they receive . For , can help remove dust and debris, and extending its lifespan.
- Seasonal Care: Prepare your program for . In winter, consider covering the turf to protect it from harsh weather conditions, which can lead to issues like infill compaction and drainage blockages.
By implementing these strategies, you can ensure that your remains a fun and inviting space for family and friends, while also maximizing the longevity and aesthetic appeal of your .

Conclusion
Creating a mini backyard golf course is not merely about fun; it represents an opportunity to transform your outdoor space into an engaging recreational area for family and friends. By selecting materials thoughtfully, designing a well-considered layout, and incorporating creative obstacles, anyone can construct a delightful putting green at home. This project provides the dual benefits of entertainment and aesthetic enhancement, making it a valuable addition to any backyard.
The article outlines essential steps, beginning with the gathering of high-quality materials such as artificial grass and pressure-treated lumber. It emphasizes the importance of designing a layout that balances challenge with enjoyment. Key considerations include:
- Incorporating various obstacles
- Ensuring accessibility
- Adding visual appeal through landscaping and decorations.
Furthermore, constructing the golf holes and maintaining the course with regular upkeep ensures longevity and continued enjoyment.
Ultimately, investing time and effort into building a mini backyard golf course can yield a rewarding space that fosters outdoor activity and family bonding. With the right approach, this project not only offers a unique entertainment option but also enhances the beauty of your home. Embrace the opportunity to create a personalized golf experience that can be enjoyed year-round. Consider reaching out to professionals for expert advice and quality materials to elevate your backyard golfing adventure.
Frequently Asked Questions
What type of artificial grass should I select for a mini backyard golf course?
You should select premium artificial grass from California Turf Company that closely resembles natural grass to ensure a realistic playing surface.
What are the benefits of using synthetic turf for a backyard golf course?
Synthetic turf is safe for children and pets, long-lasting, fashionable, and requires minimal upkeep, making it an ideal choice for a mini backyard golf course.
What is the average cost of installing artificial grass in Southern California?
The average cost of installing artificial grass in Southern California ranges from $14 to $18 per square foot.
What materials are recommended for constructing the base and borders of the golf holes?
It is recommended to use pressure-treated lumber for the base and borders of the holes, and plywood sheets can be used for constructing ramps and obstacles.
What tools do I need to build a mini backyard golf course?
Essential tools include a drill, saw, measuring tape, level, and possibly a shovel for any digging required.
How can I enhance the visual appeal of my mini backyard golf course?
You can enhance the visual appeal by incorporating decorative items such as rocks, plants, or themed decorations to create an inviting atmosphere.
Why is proper base preparation and drainage important?
Proper base preparation and drainage are crucial for maintaining the longevity and performance of your putting greens.
How can I get tailored solutions for my artificial grass and putting green needs?
You can initiate a free consultation with California Turf Company to discuss your vision and receive tailored solutions for your premium artificial grass and putting green needs.
List of Sources
- Gather Essential Materials and Tools
- Artificial Turf Market Size, Share 2031 Industry Report (https://mordorintelligence.com/industry-reports/artificial-turf-market)
- Artificial Turf Market Size And Share | Industry Report, 2033 (https://grandviewresearch.com/industry-analysis/artificial-turf-market)
- How Much Does Artificial Grass Cost in 2026? (https://lawnstarter.com/blog/cost/artificial-grass-price)
- Backyard Putting Green Design Trends Homeowners Will Love in 2026 (https://artificialturfexpress.com/blog/backyard-putting-green-design-trends)
- The Rise of Synthetic Turf in Golf: A Game Changer for the Greens (https://oreateai.com/blog/the-rise-of-synthetic-turf-in-golf-a-game-changer-for-the-greens/63d6497ba649021ec54c85a3ef3a69ab)
- Design Your Mini Golf Course Layout
- How to Create the Ultimate Mini Golf Course in Your Backyard (https://thrillist.com/shopping/nation/how-to-make-a-miniature-golf-course-diy-tips-what-to-buy)
- 6 Types of Backyard Mini Golf Courses for Endless Fun - Harris Miniature Golf Courses Inc. (https://harrisminigolf.com/6-types-of-backyard-mini-golf-courses-for-endless-fun)
- minigolfcreations.com (https://minigolfcreations.com/design-tips-mini-golf)
- Construct the Golf Holes and Obstacles
- How To Make Your Backyard Putting Green Dream a Reality (https://usga.org/content/usga/home-page/course-care/green-section-record/62/issue-17/how-to-make-your-backyard-putting-green-dream-a-reality.html)
- How to Make a Miniature Golf Course in Your Backyard - AGL (https://artificialgrassliquidators.com/build-your-own-putting-green)
- How To Create the Perfect Mini Golf Course with Artificial Grass - SGW Bay Area (https://sgwbayarea.com/blog/how-to-create-the-perfect-mini-golf-course-with-artificial-grass)
- Guide to Design and Build the Best Backyard Putting Green (https://golfsupplydirect.com/blogs/news/guide-to-design-and-build-the-best-backyard-putting-green?srsltid=AfmBOore2gTPXIRHq4QSE-2xjsfGg8bAKUzEfFxbOi1yOLi1g4pl-DK5)
- Add Finishing Touches and Maintenance Tips
- Artificial Turf Maintenance Guide | Cleaning & Care Tips (https://fieldturflandscape.com/maintenance/artificial-turf-maintenance-guide)
- Artificial Golf Greens Maintenance Tips in Oakley (https://southwestgreenseastbay.com/blog/artificial-golf-greens-maintenance-tips-in-oakley)
- Fall Turf Maintenance: 7 Essential Tips (https://cleanturfcanada.com/blog/fall-turf-maintenance-7-essential-tips)
- 10 Tips for Maintaining an Artificial Grass Putting Green (https://wintergreengrass.com/10-tips-for-maintaining-an-artificial-grass-putting-green)