Introduction
Artificial turf installation involves more than simply rolling out synthetic grass; it demands a meticulous approach to create a durable and visually appealing lawn. By understanding the essential steps in this process, homeowners can effectively transform their outdoor spaces.
What are the critical preparations and techniques that can significantly impact an artificial turf installation? To achieve a flawless and long-lasting synthetic landscape, it is vital to explore the intricacies of:
- Site Preparation: Properly preparing the site is crucial for ensuring the longevity of the turf.
- Sub-Base Selection: Choosing the right sub-base material can affect drainage and stability.
- Infill Application: The application of infill materials plays a key role in the turf's performance and appearance.
- Edge Securing: Securing the edges effectively prevents shifting and enhances the overall look.
By focusing on these critical elements, homeowners can unlock the secrets to a successful artificial turf installation.
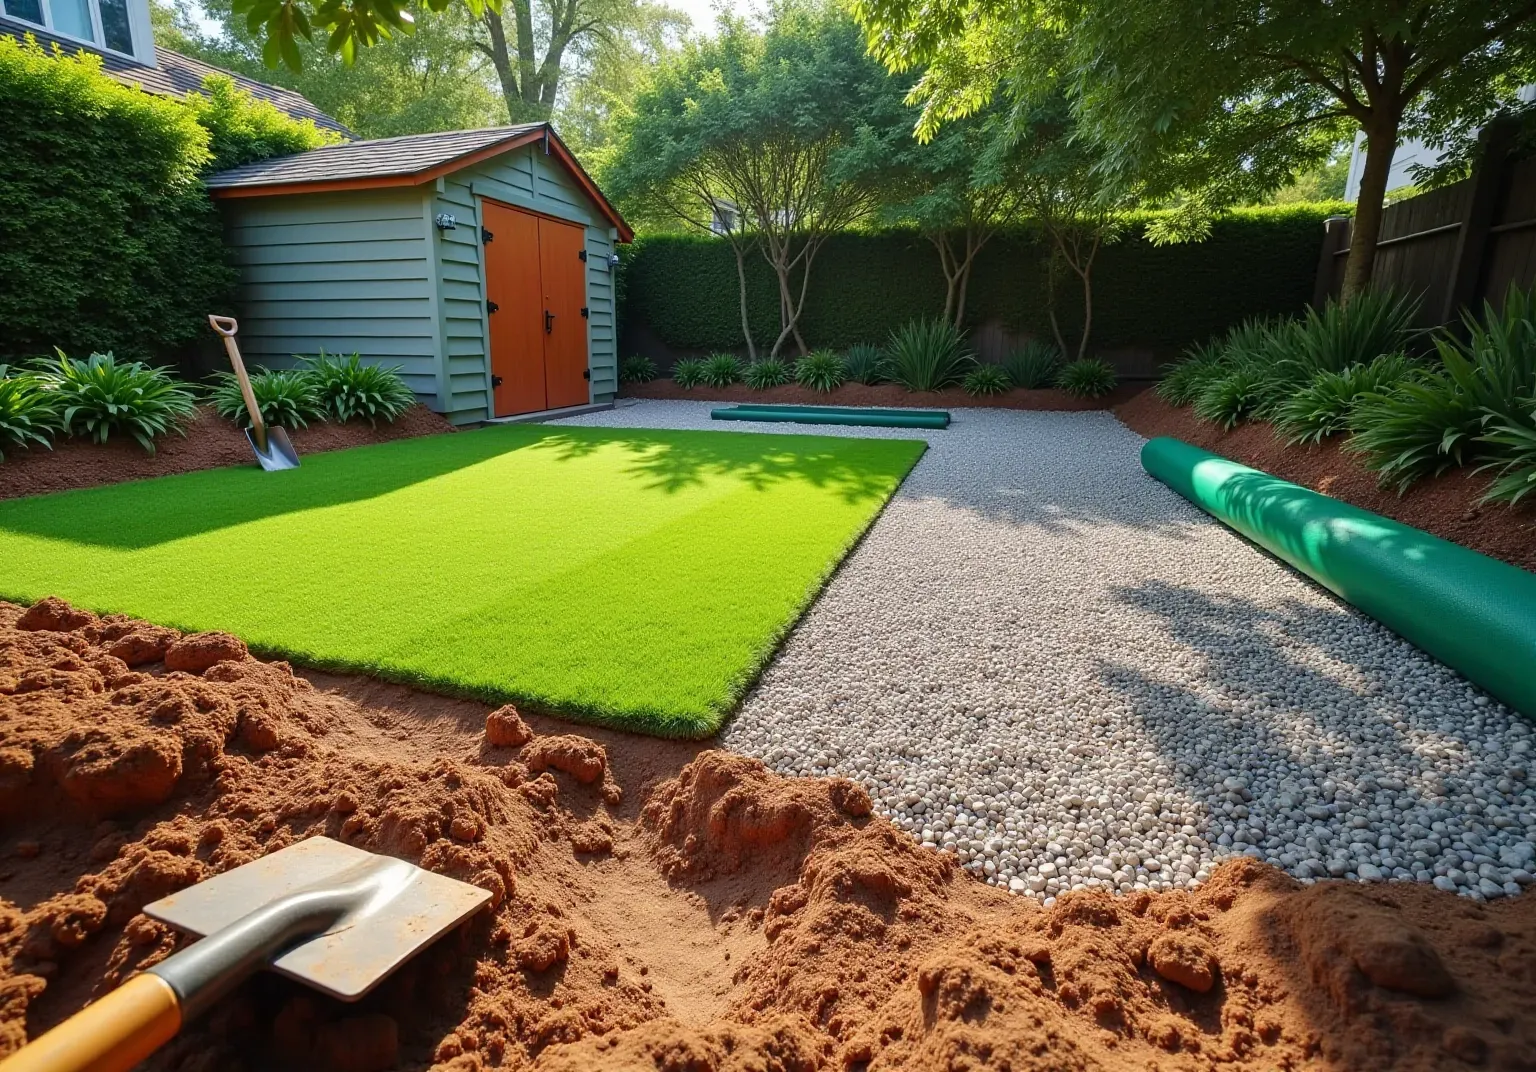
Prepare the Installation Area
To ensure a successful , it's important to know how artificial turf is installed, which involves . Here are the :
- Clear the Area: Start by removing any existing grass, weeds, and debris from the site. Use a shovel or sod cutter to eliminate all organic substances, preventing future growth and ensuring a .
- Excavate the Soil: Dig down approximately to create a level surface. This depth accommodates the sub-base and infill materials necessary for supporting the grass, allowing for optimal drainage and stability.
- Grade the Soil: Proper grading is vital for effective drainage. Aim for a slight slope away from buildings or structures to , which can compromise the integrity of the grass over time.
- Add a Weed Barrier and Base Layer: After grading, consider adding a . Then, lay down a layer of crushed stone or decomposed granite, compacting it to improve stability and drainage.
- Compact the Soil: Use a plate compactor to compress the soil, . This step is crucial to prevent settling after the grass is installed, which can result in uneven surfaces and reduce the aesthetic appeal of your lawn.
- Secure the Grass: Once the grass is laid, with grass nails or galvanized steel stakes every 4-6 inches to ensure it remains in place.
By following these steps, homeowners can understand how artificial turf is installed to create a solid foundation, ensuring durability and a visually appealing landscape. Effective installations emphasize the significance of careful preparation, as it directly influences the . Engaging professionals for this process can also help mitigate potential challenges, ensuring a smooth installation experience.

Lay the Sub-Base for Stability
- Choose the Right Material: Select or for your sub-base. These materials are preferred due to their excellent drainage capabilities and stability, which are essential when considering how is installed. Additionally, consider using geotextile fabric beneath the sub-base to serve as a , enhancing durability and preventing unwanted plant growth.
- Spread the Sub-Base: Distribute the evenly across the prepared area, aiming for a depth of approximately 2 to 3 centimeters for residential installations. For commercial applications, a depth of 3 to 4 inches is recommended to accommodate higher foot traffic and ensure .
- Compact the Sub-Base: Use a plate compactor to thoroughly . This step is crucial for achieving a , which is vital for the longevity of the grass. Experts emphasize that a well-constructed sub-base is essential to avoid issues such as buckling or uneven surfaces in the installed grass.
- Check for Levelness: After compacting, verify the evenness of the surface using a level. Make necessary adjustments by adding or removing material to ensure a perfectly flat base. Understanding is critical because proper installation prevents water from accumulating beneath the , which can lead to unpleasant odors, mold, and damage to the base layer.

Add Infill for Enhanced Performance
-
Select the Right Filler: Choose a . Options include:
- Silica Sand: Known for its excellent drainage in wet climates.
- Crumb Rubber: Offers .
- Organic Infills: Enhance sustainability and temperature regulation.
Each category provides unique benefits, such as . It is crucial to consider how is installed for the intended application of the grass. Additionally, .
-
Distribute the Material: Utilize a drop spreader to evenly spread the material across the turf surface. Aim for a depth of approximately 1/2 inch to 3/4 inch, ensuring adequate coverage without overloading the grass blades.
-
Brush the Material: After spreading, employ a to work the material into the grass fibers. This step is essential as it aids the material in settling properly, and performance while preventing matting of the grass, which relates to .
-
Final Touches: Once the infill is evenly distributed, perform a , creating a natural appearance. This not only enhances the visual appeal but also guarantees optimal performance of the surface, making it ready for use.

Secure the Edges of the Turf
- : After laying the grass, it is essential to trim any excess material along the edges. This ensures a precise fit against borders or structures, contributing to a polished appearance and preventing unsightly overlaps.
- : To secure the grass edges, use landscape staples or galvanized nails, placing them approximately 6 inches apart along the perimeter. This spacing is crucial for keeping the grass firmly anchored, and maintaining its integrity over time.
- : For a , of the grass beneath adjacent hardscaping or edging materials with a professional carpet tucking tool. This technique not only conceals seams but also , creating a clean and professional look. Be mindful of potential trip hazards in high-traffic areas when tucking edges.
- : Conduct a thorough walk-around of the perimeter to verify that all edges are secure and the turf is correctly positioned. Make any necessary adjustments to ensure a flawless appearance, as meticulous attention to detail at this stage can prevent future maintenance issues.

Conclusion
Successfully installing artificial turf requires careful planning and execution. This ensures that homeowners can enjoy a beautiful, low-maintenance lawn for years to come. By following the essential steps outlined in this guide-site preparation, sub-base installation, infill application, and securing the edges-homeowners can establish a foundation for a durable and visually appealing landscape.
Each phase in the installation process is crucial. Key steps include:
- Clearing the area and compacting the soil: This prepares the site for optimal drainage and stability.
- Selecting the right infill: The choice of infill affects the performance and longevity of the artificial grass.
- Securing the edges: Proper edge securing prevents shifting and enhances the overall appearance.
Proper preparation not only enhances drainage and stability but also prevents future maintenance issues. This makes it essential for a successful installation.
Ultimately, investing time and effort into the installation process pays off with a stunning and functional lawn. Homeowners are encouraged to consider these steps carefully and, if needed, seek professional assistance to ensure a seamless installation experience. Embracing the benefits of artificial turf can transform outdoor spaces, providing a vibrant and hassle-free environment for relaxation and recreation.
Frequently Asked Questions
What is the first step in preparing the installation area for artificial grass?
The first step is to clear the area by removing any existing grass, weeds, and debris from the site using a shovel or sod cutter.
How deep should the soil be excavated for artificial grass installation?
The soil should be excavated approximately 3-4 inches to create a level surface that accommodates the sub-base and infill materials.
Why is grading the soil important during the installation process?
Grading the soil is important for effective drainage; it should have a slight slope away from buildings or structures to prevent water pooling, which can compromise the grass's integrity.
What should be added after grading the soil to prevent weed growth?
After grading, a weed barrier should be added to prevent future weed growth, followed by a layer of crushed stone or decomposed granite, which should be compacted for stability and drainage.
How can the soil be compacted effectively?
The soil can be compacted using a plate compactor, which creates a firm base and prevents settling after the grass is installed.
How should the grass be secured once it is laid?
The grass should be secured around the perimeter with grass nails or galvanized steel stakes every 4-6 inches to ensure it remains in place.
Why is careful preparation emphasized in the installation of artificial turf?
Careful preparation is emphasized because it directly influences the durability and performance of the grass, ensuring a solid foundation and a visually appealing landscape.
List of Sources
- Prepare the Installation Area
- justanswer.com (https://justanswer.com/home-improvement/ixp28-prepare-area-artificial-grass.html)
- shawgrass.com (https://shawgrass.com/about/news-blog/how-to-prep-for-artificial-grass-installation)
- How to Install Artificial Turf on Dirt | US Turf (https://usturfsandiego.com/news/how-to-install-artificial-turf-on-dirt)
- Artificial Turf Installation Service Market Size 2026 | Forecasts, Insights & Opportunities 2033 (https://linkedin.com/pulse/artificial-turf-installation-service-market-size-88tkc)
- Lay the Sub-Base for Stability
- What’s the Best Base Material for Artificial Turf? – Xtreme Green Synthetic Turf (https://xgreensynthetic.com/best-base-artificial-turf)
- How to Choose the Right Base for Artificial Grass (https://realturf.com/us/what-sub-base-is-best-for-your-artificial-grass)
- What’s the Best Base for Artificial Grass Installation? - US Turf (https://us-turf.com/uncategorized/best-base-artificial-grass-installation)
- Artificial Grass Sub-Base explained | Purchase Green Artificial Grass (https://purchasegreen.com/blog/artificial-grass-sub-base)
- Add Infill for Enhanced Performance
- Artificial Turf Infill Options (Pros, Cons & Best Uses) | US Turf (https://usturfsandiego.com/news/artificial-turf-infill-options)
- Infill for Artificial Grass: Everything You Need to Know (https://blog.turfdistributors.com/infill-for-artificial-grass)
- Best Artificial Turf Infill of 2025 - UniWest (https://unitedwesterndenver.com/blogs/best-artificial-turf-infill-of-2025)
- The Complete Guide to Artificial Turf Infill – Xtreme Green Synthetic Turf (https://xgreensynthetic.com/artificial-turf-infill-guide)
- Secure the Edges of the Turf
- Artificial Turf Edging: A Comprehensive Guide (https://artificialturfsupply.com/artificial-turf-edging)
- How to Secure Artificial Turf Perimeter Edges: Galvanized Nails or Sod Staples (https://artificialturfsupply.com/how-to/how-to-secure-artificial-turf-perimeter-edges-galvanized-nails-or-sod-staples)
- syntheticgrasswarehouse.com (https://syntheticgrasswarehouse.com/company/ask-an-expert/ask-jw/tucking-synthetic-turf-edges)
- Everything You Need To Know About Anchoring Artificial Grass During Installation - SGW Nevada (https://sgwnevada.com/blog/everything-you-need-to-know-about-anchoring-artificial-grass-during-installation)