Introduction
Transforming a yard into a lush, green oasis may appear daunting, particularly when it comes to installing synthetic turf. This durable alternative to natural grass not only enhances outdoor aesthetics but also provides low maintenance and year-round appeal. However, achieving a flawless finish requires careful preparation and execution during the installation process.
To ensure a professional-quality installation that stands the test of time, it is essential to understand the necessary steps and tools involved. This article will outline these critical components, guiding you through the process of creating a beautiful and sustainable outdoor space.
Prepare the Installation Area
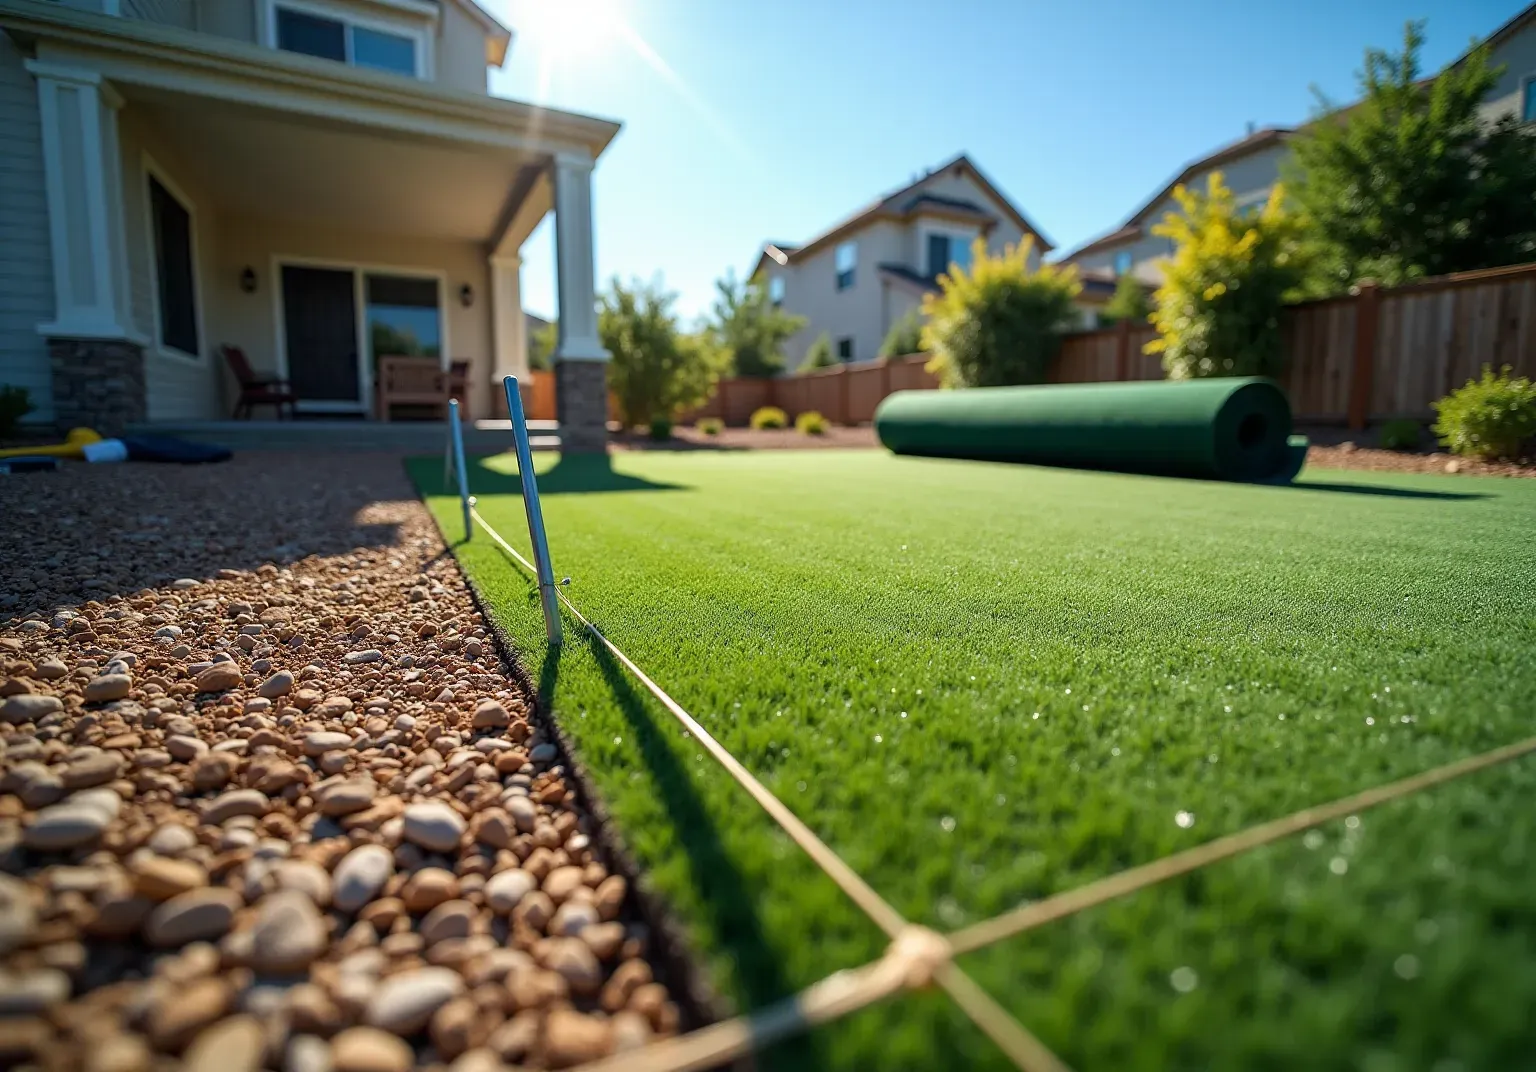
- Measure and Mark the Area: Start by outlining the setup area for the using stakes and string. Accurate ; ensure the dimensions are precise to avoid discrepancies during installation. Landscaping professionals highlight that proper marking can significantly streamline the installation process. Additionally, to prevent movement.
- Remove: Clear the area of any existing grass, weeds, and debris using a sod cutter or shovel. Aim to excavate at least 2-1/2 to 4 inches of soil to create a stable foundation for the grass. This step is essential to with uneven surfaces.
- Excavate the Area: Dig down to the required depth, ensuring the ground is level. This is vital for adequate drainage and to prevent water accumulation, which can compromise the integrity of the grass over time.
- Create a: . This proactive measure helps prevent water buildup beneath the grass, ensuring longevity and performance.
- Compact the Soil: Use a plate compactor or tamper to . This step is crucial for achieving a smooth, even surface, which is necessary for a successful setup. If the grass is intended for a , consider adding foam padding as an underlayment for enhanced safety. Following these guidelines can lead to a professional-quality result that enhances your outdoor space. After setup, allow the to settle for a few hours to avoid creasing and ensure a natural appearance.

Gather Necessary Tools and Materials
- Tools Needed:
- Shovel: , typically used to .
- Rake: A landscape rake is crucial for leveling the , ensuring a uniform surface for grass installation.
- Plate Compactor: This tool compacts the soil and , preventing future sinking or settling of the grass.
- Utility Knife: Necessary for trimming the grass to fit the specified space, ensuring clean edges and a seamless appearance.
- Box Cutter: Important for fitting the sod to the shape of the yard, with cuts made from the back of the sod.
- Measuring Tape: Utilized to obtain precise dimensions of the installation space, which is essential for calculating the quantity of grass and materials required.
- Hammer or Mallet: Necessary for fastening the grass with stakes or nails around the perimeter, ensuring stability over time.
- Grass Staples or Nails: These are used to hold the grass in place, with recommended for securing the edges and preventing movement.
- Materials Needed:
- : Select the appropriate type based on your specific needs, such as pet-friendly options or putting greens designed for optimal performance.
- : Crushed stone or decomposed granite acts as the foundational layer, offering stability and adequate drainage for the grass.
- : This material helps , although it may not be suitable for pet owners.
- Infill Material: Options like silica sand or rubber granules are essential for supporting the grass blades, providing cushioning, and maintaining a natural appearance.
- Safety Gear: Always prioritize safety by wearing gloves, safety glasses, and knee pads during the installation process to protect yourself from potential injuries.

Install the Synthetic Turf
- Lay the Base Material: Begin by excavating the existing soil to a and weed barrier. Next, spread , aiming for a depth of 2-3 inches. Use a rake to level the surface, which is crucial for proper drainage and stability.
- : material thoroughly using a plate compactor. This step is vital for installing , as it establishes a strong base that will support the turf and prevent shifting over time. Professionals emphasize that a well-compacted base is essential for and should feel like packed soil, which is important for the longevity of the installation. Be cautious not to over-compact, as this can lead to drainage issues or unevenness.
- : Lay a weed barrier fabric over the compacted base. This will help prevent weeds from growing through the grass, ensuring a clean and .
- Unroll the Surface: Carefully unroll the synthetic material over the prepared area. Allow it to acclimate for a few hours to minimize curling, as this can affect the process of installing .
- Trim the Grass to Fit: Use a utility knife to for a precise fit. Ensure that seams are tight and aligned to create a seamless appearance.
- Secure the Grass: Fasten the edges of the grass to the ground using or galvanized nails, positioning them every 6-8 inches along the perimeter and seams. This will help keep the surface in place while and prevent movement.
- Add Infill Material: Finally, using a broom or spreader. This not only supports the grass blades but also provides cushioning, enhancing the overall feel and performance of the synthetic lawn.
Note: Most synthetic grass installation projects require 1-3 days for small spaces or up to a week for larger landscaping endeavors.

Complete Final Touches and Maintenance Tips
- Final Inspection: Conduct a of the area after installing to identify any loose edges or areas that require additional securing. Make the necessary adjustments to ensure a .
- Brush the Grass: using a broom, especially in . This practice not only helps maintain a natural appearance but also prevents matting, ensuring the grass remains vibrant and inviting.
- Regular Cleaning: Rinse the surface with water to remove dust and debris. For pet owners, it is essential to . A mixture of mild soap and water can effectively address spills and stains.
- Check for Weeds: Periodically . If any weeds appear, remove them promptly to prevent spreading and to protect the grass's integrity.
- Seasonal: Depending on your climate, seasonal may be necessary. For instance, brush the grass after heavy rains or snow to maintain its appearance and avoid moisture accumulation that could lead to mold.
- For significant issues or deep cleaning needs, consider hiring a that specializes in installing . Experts can provide comprehensive , ensuring your remains in optimal condition and extends its lifespan.

Conclusion
Installing synthetic turf can significantly enhance an outdoor space, transforming it into a vibrant, low-maintenance area that boosts both beauty and functionality. This process, while detailed, can be effectively achieved through careful planning and execution. By adhering to the outlined steps - from preparing the installation area to ensuring proper maintenance - homeowners can attain professional results that endure over time.
Key elements of the installation process include:
- Accurately measuring and marking the area.
- Removing existing grass.
- Ensuring proper drainage and soil compaction.
Gathering the right tools and materials, such as a utility knife, plate compactor, and appropriate infill, is essential for a smooth installation. Additionally, taking the time to secure the turf properly and performing regular maintenance will help preserve its appearance and longevity.
Ultimately, the successful installation of synthetic turf not only enhances the aesthetic appeal of a property but also offers a practical solution for outdoor enjoyment. Embracing these best practices ensures that the investment in synthetic grass pays off, resulting in a beautiful, functional lawn that requires minimal upkeep. For those considering this upgrade, the benefits are clear: create a lush green space that can be enjoyed year-round without the hassle of traditional lawn care.
Frequently Asked Questions
How do I prepare the installation area for synthetic turf?
Start by measuring and marking the setup area using stakes and string. Accurate measurements are crucial to avoid discrepancies during installation. Secure the weed barrier with 6-inch galvanized nails or landscape anchors.
What should I do with existing grass and debris before installing synthetic turf?
Clear the area of any existing grass, weeds, and debris using a sod cutter or shovel. Aim to excavate at least 2-1/2 to 4 inches of soil to create a stable foundation for the turf.
Why is it important to excavate the area before installation?
Excavating the area ensures the ground is level and provides adequate drainage, preventing water accumulation that can compromise the grass's integrity over time.
What type of drainage plan should I implement for synthetic turf?
Implement a slight slope (approximately 2%) away from structures to facilitate water runoff, which helps prevent water buildup beneath the grass.
How do I compact the soil for synthetic turf installation?
Use a plate compactor or tamper to compact the soil, creating a firm base that supports the grass and prevents sinking. This step is essential for achieving a smooth, even surface.
Should I add any padding if the synthetic turf is for a play area?
Yes, consider adding foam padding as an underlayment for enhanced safety if the turf is intended for a play area.
How long should I allow the artificial grass to settle after installation?
Allow the artificial grass to settle for a few hours to avoid creasing and ensure a natural appearance.
List of Sources
- Prepare the Installation Area
- A Step-by-Step Guide to Installing Artificial Turf Grass (https://lowes.com/n/how-to/install-artificial-grass)
- syntheticturfnorthwest.com (https://syntheticturfnorthwest.com/a-helpful-guide-to-installing-synthetic-turf-diy)
- shawgrass.com (https://shawgrass.com/about/news-blog/how-to-prep-for-artificial-grass-installation)
- petgrows.com (https://petgrows.com/blogs/news/mastering-the-art-of-artificial-turf-installation-a-step-by-step-guide)
- How to Install Artificial Grass: DIY Tips For Your Lawn (https://flooringinc.com/blog/how-to-install-artificial-grass?srsltid=AfmBOorgWQX6LJ3YUMfjcRz2mlHmf6kWh7K9vowphlouXoQtI_DrGvrc)
- Gather Necessary Tools and Materials
- syntheticturfnorthwest.com (https://syntheticturfnorthwest.com/a-helpful-guide-to-installing-synthetic-turf-diy)
- Artificial Grass Install Accessories That Should Be in Every Installer’s Toolkit - SGW Phoenix (https://sgwarizona.com/phoenix/blog/artificial-grass-install-accessories-that-should-be-in-every-installers-toolkit)
- How to Install Artificial Turf in Your Yard: A Step-by-Step Guide (https://tomahawk-power.com/blogs/articles/how-to-install-artificial-turf-in-your-yard-a-step-by-step-guide?srsltid=AfmBOoprFbtIXrCjKZRGja5cszC5FprMSUN23mMXT--qxPQ47zH0hHpO)
- DIY Guide: Essential Tools for Installing (https://blog.artificialgrassrecyclers.com/diy-guide-tools-you-need-to-install-your-own-artificial-turf)
- 5 Key Supplies You Need for Your Next Artificial Turf Installation - SGW Dallas (https://sgwtexas.com/dallas/blog/2023/02/28/5-key-supplies-you-need-for-your-next-artificial-turf-installation)
- Install the Synthetic Turf
- petgrows.com (https://petgrows.com/blogs/news/mastering-the-art-of-artificial-turf-installation-a-step-by-step-guide)
- How to Install Artificial Turf on Dirt | US Turf (https://usturfsandiego.com/news/how-to-install-artificial-turf-on-dirt)
- How to Install Artificial Turf: Step-by-Step Guide | US Turf (https://usturfsandiego.com/news/how-to-install-artificial-turf)
- Artificial Turf Installation a DIY Guide (https://synlawn.com/articles/artificial-turf-installation-a-diy-guide)
- How Long Does Artificial Turf Last | Synthetic Turf International Blog (https://synthetic-turf.com/artificial-grass-durability-how-long-does-turf-last)
- Complete Final Touches and Maintenance Tips
- How To Maintain & Care For Your Synthetic Grass | SGW (https://syntheticgrasswarehouse.com/resources/maintenance-care)
- How to Maintain Your Artificial Grass All Year Round (https://synlawn.com/articles/how-to-maintain-artificial-grass)
- 6 Tips for Maintaining Artificial Turf | Magnolia Turf (https://magnoliaturf.com/tips-for-artificial-grass-maintenance)
- frdmturf.com (https://frdmturf.com/blog/how-to-take-care-of-artificial-turf)
- Artificial Turf Maintenance Guide | Cleaning & Care Tips (https://fieldturflandscape.com/maintenance/artificial-turf-maintenance-guide)