Introduction
Transforming an ordinary outdoor space into a golfer's paradise is achievable through the creation of a backyard putting green. This project not only enhances recreational opportunities but also adds aesthetic appeal to your home.
This guide offers a comprehensive, step-by-step approach to installing a putting green, enabling golf enthusiasts to refine their skills right at home. However, the journey from vision to reality presents several challenges. For instance, what if the chosen location does not drain well? Or what if the turf does not lay flat?
Addressing these critical considerations is essential for ensuring a successful installation that withstands the test of time.
Assess Your Space and Define Your Goals
- Assess Your Yard: Begin by measuring the designated space for your . Look for a flat, level area that receives ample sunlight and is free from obstructions such as trees or large rocks. This ensures optimal playability and ease of maintenance. In California, the typically ranges from 200 to 1,000 square feet, accommodating various design complexities.
- Define Your Objectives: Consider what you want to achieve with your . Are you looking for a , a recreational area for family gatherings, or a to ? Clearly defining your goals will guide your design choices and feature selections. As noted by landscape architects, "A clearly defined purpose for your and functionality."
- Consider Size and Shape: Based on your yard's dimensions and your defined goals, determine the size and shape of your golf area. Larger spaces allow for intricate designs, including multiple holes and varied terrains, while smaller areas may require a more straightforward layout. , enhancing both playability and aesthetics.
- Plan for Features: Envision any additional elements you might want to include, such as bunkers, slopes, or water features. These enhancements can increase the authenticity and enjoyment of your golf area, . Thoughtful incorporation of these elements not only enhances aesthetic appeal but also , with research indicating that well-crafted golf areas can improve by an average of 24%.

Gather Necessary Materials and Tools
-
List of Materials: To successfully install a , gather the following materials:
- specifically designed for putting greens from , recognized for its durability and low maintenance.
- Base materials such as crushed stone or decomposed granite to .
- Infill material, if necessary, to enhance the turf's performance and replicate the feel of natural grass.
- Landscape fabric to prevent weed growth and maintain a tidy area.
- to complete the setup, adding authenticity to your green.
- Adhesive or seam tape, if applicable, for securing seams and ensuring a seamless finish.
-
: Ensure you have the following essential tools:
- Shovel and rake for ground preparation to create a level surface.
- Plate compactor to level the base and minimize air pockets, ensuring stability.
- Utility knife for precise turf cutting, allowing for accurate fitting.
- Measuring tape for accurate dimensions to ensure the right fit for your space.
- Level to guarantee a flat surface for optimal playability.
- Safety gloves and goggles for personal protection during installation.
- At least two individuals for secure assembly and disassembly of the kit, ensuring efficiency and safety.
-
Purchase or Rent: Consider whether to purchase or rent tools based on your budget and future usage. Local hardware stores typically offer rental options, making it . Average rental prices for landscaping tools in Southern California can vary, so it's advisable to compare rates to find the best deal. A typically requires at least a couple of full days or potentially a few weekends of work. As Eric Fullerton states, "Preparation and research are the key here." After installation, before use to ensure its longevity and performance. A well-constructed putting green from can last 15 years or more, making it a worthwhile investment.

Follow the Step-by-Step Installation Process
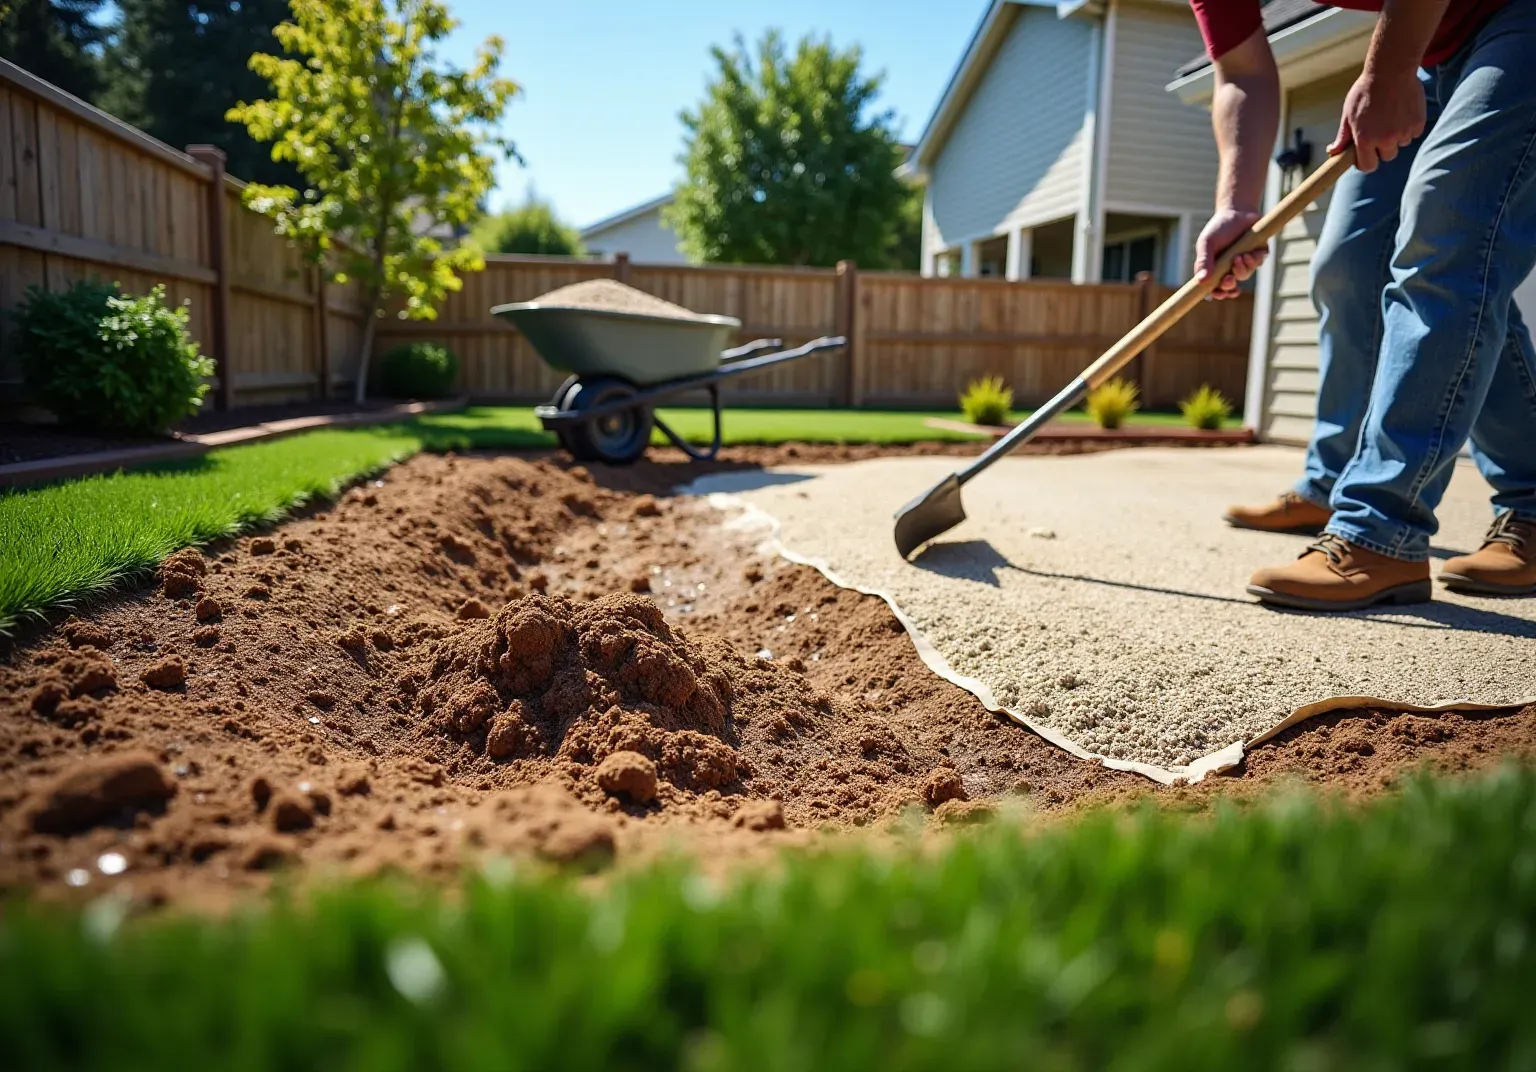
- Prepare the Site: Start by clearing the area of any existing grass, debris, or rocks. Use a shovel to remove sod and level the ground, ensuring a . After excavation, check for any remaining debris to guarantee a clean area for the turf.
- : Lay down a layer of crushed stone or decomposed granite to create a solid foundation. It is advisable to use a combination of crushed stone and geotextile fabric beneath the base material to prevent weed growth and maintain the lawn's structural integrity. Compact the base thoroughly with a plate compactor to ensure it is level and stable, which is crucial for the longevity of your .
- Lay Landscape Fabric: Place landscape fabric over the base to prevent weeds from growing through the grass, ensuring a clean and low-maintenance surface.
- Cut and Lay the Grass: Unroll the and cut it to fit your desired shape. Ensure the grain of the surface is consistent for a natural appearance. Place the sod over the prepared area, ensuring it fits snugly against edges and corners.
- Secure the Grass Cover: Use adhesive or seam tape to fasten the edges of the grass cover. If infill is included in your design, distribute it uniformly over the surface to weigh down the grass and enhance the realistic feel.
- : Cut holes for the golf cups and insert them according to the manufacturer's instructions. Adding flags to the cups completes the look and functionality of your .
- : Brush the turf with a stiff-bristle broom to stand the fibers upright and ensure everything is secure. Inspect for any uneven areas and make adjustments as necessary to maintain a smooth playing area.
: Neglecting and surface instability. Additionally, failing to compact the base adequately is essential for a durable installation. On average, the process for can take a weekend, depending on the size and complexity of your design. As often emphasize, thorough preparation is key to a successful installation, ensuring that your not only looks great but also performs well for years to come.

Troubleshoot Common Installation Issues
- Uneven Surface: If you notice , use a utility knife to cut the grass and adjust the base material underneath. Recompact the area and re-lay the grass to restore a flat plane. Regular inspections are crucial; scheduled checks of can identify potential issues early, preventing further complications.
- : If weeds appear, first verify that the landscape fabric was installed correctly. A beneath the grass can significantly inhibit , as studies indicate that such barriers are effective in preventing weed issues. If weeds persist, consider applying a spot treatment designed for artificial areas or manually removing them to maintain a pristine lawn.
- : Should the edges of the grass begin to lift, check that the adhesive or seam tape was applied correctly. Reapply adhesive as necessary and secure the edges with weights until it sets. are essential for preventing this issue from arising in the first place.
- : Water accumulating on the surface suggests that the base may not be . Adjust the base material to create a slight slope away from structures, ensuring effective water runoff. Inadequate drainage can lead to puddling, creating an uncomfortable and unattractive area. This modification is essential for preserving the durability of your grass and preventing soil compaction underneath.
- : If the infill is uneven, use a broom to distribute it uniformly across the area. Ensure that the infill type is suitable for your grass, as proper infill selection helps control surface temperatures and enhances performance. Additionally, be aware that can heat up significantly on hot days, potentially causing burns to bare feet and pets. Regular maintenance, including brushing and cleaning, is vital for keeping the turf in optimal condition.

Conclusion
Creating a backyard putting green offers a unique opportunity to blend the enjoyment of golf with the aesthetics of outdoor living. By assessing your space, defining your goals, and adhering to a structured installation process, you can transform your yard into a personal golfing oasis. The satisfaction derived from honing your skills in a custom-designed area not only enhances your game but also increases your property value.
Key steps to consider include:
- Assessing your yard to determine the best location and size for your putting green.
- Gathering the necessary materials and tools for installation.
- Following a detailed installation process to ensure quality and durability.
Common challenges, such as uneven surfaces and drainage issues, should also be addressed. By implementing effective troubleshooting strategies, you can maintain your putting green in optimal condition. Understanding these essential components and techniques will enable you to create a space that fulfills your golfing needs while enhancing your outdoor environment.
Ultimately, dedicating time and effort to a backyard putting green can yield years of enjoyment and improvement in your golf game. This investment not only beautifies your landscape but also allows you to indulge in your passion for golf. Whether for personal enjoyment or as an impressive feature for entertaining friends and family, the advantages of a well-installed putting green are clear. Begin planning your local putting green installation today to ensure a rewarding and lasting addition to your home.
Frequently Asked Questions
How should I begin assessing my space for a golf practice area?
Start by measuring the designated space in your yard, looking for a flat, level area that receives ample sunlight and is free from obstructions like trees or large rocks to ensure optimal playability and ease of maintenance.
What is the average size for residential golf practice areas in California?
The average size for residential golf practice areas in California typically ranges from 200 to 1,000 square feet, accommodating various design complexities.
Why is it important to define my objectives for the golf practice area?
Clearly defining your goals helps guide your design choices and feature selections, whether you want a space to refine your golf skills, a recreational area for family gatherings, or a visually appealing landscape feature.
How does the size and shape of my yard influence the golf area design?
The dimensions of your yard and your defined goals will determine the size and shape of your golf area. Larger spaces allow for intricate designs, while smaller areas may require a more straightforward layout.
What additional features can I include in my golf practice area?
You might consider incorporating features such as bunkers, slopes, or water elements, which can enhance the authenticity and enjoyment of your golf area, making it a versatile outdoor environment.
How can adding features to my golf area affect my property value?
Thoughtful incorporation of features can not only enhance aesthetic appeal but also increase the overall value of your property, with research indicating that well-crafted golf areas can improve property value by an average of 24%.
List of Sources
- Assess Your Space and Define Your Goals
- Why Backyard Putting Greens Are the New Must-Have for Luxury Homeowners - Back Nine Greens (https://backninegreens.com/blog/why-backyard-putting-greens-are-the-new-must-have-for-luxury-homeowners)
- Luxury Putting Green Trends in 2026 (https://bestputtinggreensandturfpalmdesert.com/blog/luxury-putting-green-trends-in-2026)
- 5 Popular Artificial Turf Putting Green Design Trends to Try in 2026 - SGW Sacramento (https://sgwsacramento.com/blog/5-popular-artificial-turf-putting-green-design-trends-to-try-in-2026)
- How a Custom Putting Green Can Transform Your Backyard in 2025 (https://infinitygolfgreens.com/how-a-custom-putting-green-can-transform-your-backyard-in-2025)
- Backyard Putting Green Design Trends Homeowners Will Love in 2026 (https://artificialturfexpress.com/blog/backyard-putting-green-design-trends)
- Gather Necessary Materials and Tools
- DIY Putting Green Installation: A Step-by-Step Guide (https://artificialturfexpress.com/blog/installing-the-best-putting-greens-in-your-yard-the-ultimate-diy-guide)
- aglgrass.com (https://aglgrass.com/blogs/diy-backyard-putting-green)
- How To Build a Backyard Putting Green (https://xgrass.com/how-to-build-putting-green.html)
- What To Know When Installing a Putting Green in Your Yard (https://syntheticturfnorthwest.com/what-to-know-when-installing-a-putting-green-in-your-yard)
- Tour Greens | Backyard Putting Green Cost in 2025 (https://tourgreens.com/backyard-putting-green-cost.html)
- Follow the Step-by-Step Installation Process
- DIY Putting Green Installation: A Step-by-Step Guide (https://artificialturfexpress.com/blog/installing-the-best-putting-greens-in-your-yard-the-ultimate-diy-guide)
- How To Install the Ultimate Artificial Turf Putting Green | Synthetic Grass Warehouse (https://syntheticgrasswarehouse.com/blog/how-to-install-the-ultimate-artificial-turf-putting-green)
- A Guide To Installing An Artificial Putting Green (https://turftekusa.com/blog/a-guide-to-installing-an-artificial-putting-green)
- Artificial Turf Market, Industry Size Forecast [Latest] (https://marketsandmarkets.com/Market-Reports/artificial-turf-market-121486580.html)
- Install Your Artificial Golf Putting Green: A Step-by-Step Guide – Hall Turf: Artificial Turf Solutions (https://hallturf.com/install-your-artificial-golf-putting-green-a-step-by-step-guide)
- Troubleshoot Common Installation Issues
- 9 Problems With Artificial Grass | Angi (https://angi.com/articles/common-artificial-grass-problems.htm)
- Top Trends in Artificial Turf for 2025: What to Expect - The Turf Yard (https://theturfyard.com/top-trends-in-artificial-turf-for-2025-what-to-expect)
- Stop Weeds from Growing in Your Artificial Grass Lawn with These Tips | Smart Turf® Artificial Grass (https://smartturf.com/prevent-weeds-in-artificial-grass)
- School districts weigh pros, cons of artificial surfaces for athletics (https://altoonamirror.com/news/local-news/2016/11/school-districts-weigh-pros-cons-of-artificial-surfaces-for-athletics)